Open Zaak configuration (admin)
Before you can work with Open Zaak after installation, a few settings need to be configured first.
Note
This document describes the manual configuration via the admin. You can perform most of this configuration via the command line, which is both faster and less error prone.
Configure Notificaties API
Next, the notifications for Open Zaak must be configured. We assume you’re also using Open Notificaties to make a complete setup.
There are 2 things to keep in mind:
Open Zaak offers an Autorisaties API and thus the Open Zaak Autorisaties API must be consulted by the Notificaties API to check for autorisations.
Each component handles authentication themselves and thus we need to store the Client IDs and secrets in each component that wants to communicate with each other.
Open Zaak
The configuration steps below need to be performed in Open Zaak itself.
Open Zaak consuming the Notificaties API
Configure the credentials for the Notificaties API (so Open Zaak can access the Notificaties API):
Navigate to API Autorisaties > Services
Select Click Service toevoegen (or select the notifications service if it already exists).
Fill out the form:
Label: For example:
Open NotificatiesService slug: For example:
open-notificatiesType: Select the option:
NRC (Notifications)API root url: the full URL to the Notificaties API root, e.g.
https://notificaties.gemeente.local/api/v1/Client ID: An existing Client ID for the notifications service, or create one and configure the same value in Open Notificaties - For example:
open-zaakSecret: Some random string. You will need this later on!
Authorization type: Select the option:
ZGW client_id + secretUser ID: Same as the Client ID
User representation: For example:
Open Zaak
Click Opslaan.
Next, configure Open Zaak to use this service for the Notificaties API:
Navigate to Configuratie > Notificatiescomponentconfiguratie
Select the service from the previous step in the Notifications api service dropdown.
Sending notifications support autoretry mechanism, which can be also configured here. Fill out the following properties:
Notification delivery max retries: the maximum number of retries the task queue will do if sending a notification failed. Default is
5.Notification delivery retry backoff: a boolean or a number. If this option is set to
True, autoretries will be delayed following the rules of exponential backoff. If this option is set to a number, it is used as a delay factor. Default is3.Notification delivery retry backoff max: an integer, specifying number of seconds. If
Notification delivery retry backoffis enabled, this option will set a maximum delay in seconds between task autoretries. Default is48seconds.
Click Opslaan.
The Notificaties API consumes Open Zaak’s Autorisaties API
Open Notificaties checks the authorizations of its consumers by querying an Autorisaties API, which Open Zaak provides. Open Notificaties therefore is also a client of Open Zaak.
When Open Zaak publishes a notification, the Notifications API checks that Open Zaak is allowed to do this, via the Autorisaties API. Open Zaak must exist as an application in this API with the correct permissions.
Configure the Notificaties API access to the Autorisaties API:
Navigate to API Autorisaties > Applicaties
Click Applicatie toevoegen.
Fill out the form:
Label: For example:
Open NotificatiesClient ID: For example:
open-notificatiesSecret: Some random string. You will need this later on!
Click Opslaan en opnieuw bewerken.
Click Beheer autorisaties.
Select first Component Autorisaties API and scope autorisaties.lezen.
Select second Component Notificaties API and scopes notificaties.consumeren and notificaties.publiceren.
Click Opslaan
Finally, create an application with the correct permissions for Open Zaak itself:
Navigate to API Autorisaties > Applicaties
Click Applicatie toevoegen.
Fill out the form:
Label: For example:
Open ZaakClient ID: The same Client ID as given in Open Zaak consuming the Notificaties API, step 1c. For example:
open-zaakSecret: The same Secret as given in Open Zaak consuming the Notificaties API, step 1c
Click Opslaan en opnieuw bewerken.
Click Beheer autorisaties.
Select Component Notificaties API and scopes notificaties.consumeren and notificaties.publiceren.
Click Opslaan
Currently, Open Zaak does not require any webhook subscriptions. It will however send notifications on various API actions.
We’re not there yet! We need to configure Open Notificaties too.
Open Notificaties
Configure the Open Zaak Autorisaties API endpoint (so Open Notificaties knows where to check for the proper authorizations):
Navigate to Configuratie > Autorisatiecomponentconfiguratie
Fill out the form:
Component:
Notificaties APIAutorisations api service: click the plus icon to add a service
Fill out the form:
Label: For example:
Open ZaakService slug: For example:
open-zaakType: Select the option:
AC (Autorisaties)API root url: The URL to the Autorisaties API. For example:
https://open-zaak.gemeente.local/autorisaties/api/v1/.Client ID: The same Client ID as given in Open Zaak step 3c. For example:
open-notificatiesSecret: The same Secret as given in Open Zaak step 3c
Authorization type: Select the option:
ZGW client_id + secretUser ID: Same as the Client ID
User representation: For example:
Open Notificaties
Click Opslaan.
And in the previous window, click Opslaan.
We need to allow Open Zaak to access Open Notificaties (for authentication purposes, so we can then check its authorisations):
Navigate to API Autorisaties > Autorisatiegegevens
Click Autorisatiegegeven toevoegen.
Fill out the form:
Client ID: The same Client ID as given in Open Zaak step 1c. For example:
open-zaakSecret: The same Secret as given in Open Zaak step 1c
Click Opslaan.
All done! Now Open Zaak and Open Notificaties can access each other.
Register notification channels
Open Zaak
Before notifications can be sent to kanalen in Open Notificaties, these kanalen
must first be registered via Open Zaak.
Register the required channels:
python src/manage.py register_kanalen
Registering webhooks
Open Zaak
As discussed earlier Open Zaak does not require any webhook subscriptions, for now it publishes notifications, but doesn’t consume them.
Open Notificaties
Open Notifications uses Open Zaak Authorization API, therefore it should subscribe to changes in the
autorisaties channel. Hence Open Notificaties consumes itself and treats itself as an external service,
which required configuring related credentials.
Configure the credentials for the Open Notificaties API (so Open Notificaties can access itself):
Navigate to Configuratie > Notificatiescomponentconfiguratie
Click on the plus icon besides Service voor notificaties-api dropdown.
Fill out the form Service toevoegen:
Label: For example:
Open NotificatiesService slug: For example:
open-notificatiesType: Select the option:
NRC (Notifications)API root url: the full URL to the Notificaties API root, e.g.
https://notificaties.gemeente.local/api/v1/Client ID: We can reuse the existing Client Id from step 3c, since it already has all required permissions to consume notifications. For example:
open-notificatiesSecret: The same Secret as given in step 3c
Authorization type: Select the option:
ZGW client_id + secretUser ID: Same as the Client ID
User representation: For example:
Open Notificaties
Click Opslaan.
Configure the Open Notificaties Notificatiescomponent API endpoint (so Open Notificaties receives changes made in the authorisation component of Open Zaak ):
After the previous step 7d you should be on Configuratie > Notificatiescomponentconfiguratie page.
Select the service from the previous step in the Service voor notificaties-api dropdown, if it’s not selected.
Sending notifications support autoretry mechanism, which can be also configured here. Fill out the following properties:
Notification delivery max retries: the maximum number of retries the task queue will do if sending a notification failed. Default is
5.Notification delivery retry backoff: a boolean or a number. If this option is set to
True, autoretries will be delayed following the rules of exponential backoff. If this option is set to a number, it is used as a delay factor. Default is3.Notification delivery retry backoff max: an integer, specifying number of seconds. If
Notification delivery retry backoffis enabled, this option will set a maximum delay in seconds between task autoretries. Default is48seconds.
Click Opslaan.
- Create an abonnement for Open Notificaties API. The easiest way to do it in the Admin is by
creating and registering a webhook.
Navigate to Configuratie > Webhook-abonnementen.
Click on Webhook-abonnement toevoegen.
Fill out the form:
Callback Url: The Callback URL to the Notificaties Callback API. For example:
https://open-notificaties.gemeente.local/api/v1/callbacks.Client ID: The same Client ID as given in step 3c For example:
open-notificatiesClient Secret: The same Secret as given in step 3c
Channels:
autorisaties
Click Opslaan.
You will be redirected back to the page Configuratie > Webhook-abonnementen. Click on the checkbox and select the webhook which has been just created.
In the dropdown Actie select Webhooks registeren.
Click Uitvoeren button.
Now Notifications API has subscribed to the notifications from autorisaties channel.
You can navigate to Notificaties > Abonnementen to check that a new abonnement has been added.
Create an API token
Open Zaak
By creating an API token, we can perform an API test call to verify the successful installation.
Navigate to API Autorisaties > Applicaties and click on Applicatie toevoegen in the top right.
Give the application a label, such as test or demo, and fill out a demo
client ID and secret. Next, click on Opslaan en opnieuw bewerken in the
bottom right. The application will be saved and you will see the same page again. Now,
click on Beheer autorisaties in the bottom right, which brings you to the
authorization management for this application.
Select Catalogi API for the Component field
Check the
catalogi.lezencheckboxClick Opslaan in the bottom right
On the application detail page, you can now select and copy the JSON Web Token (JWT) shown under Client credentials, which is required to make an API call.
Warning
The JWT displayed here expires after a short time (1 hour by default) and should not
be used in real applications. Applictions should use the client ID and secret
pair to generate JWT’s on the fly.
Making an API call
Open Zaak
We can now make an HTTP request to one of the APIs of Open Zaak. For this example, we have used Postman to make the request.
Make sure to set the value of the Authorization header to the JWT that was copied in the previous step.
Then perform a GET request to the list display of ZaakTypen (Catalogi API) - this
endpoint is accessible at {{base_url}}/catalogi/api/v1/zaaktypen (where
{{base_url}} is the domain configured in environment variables).
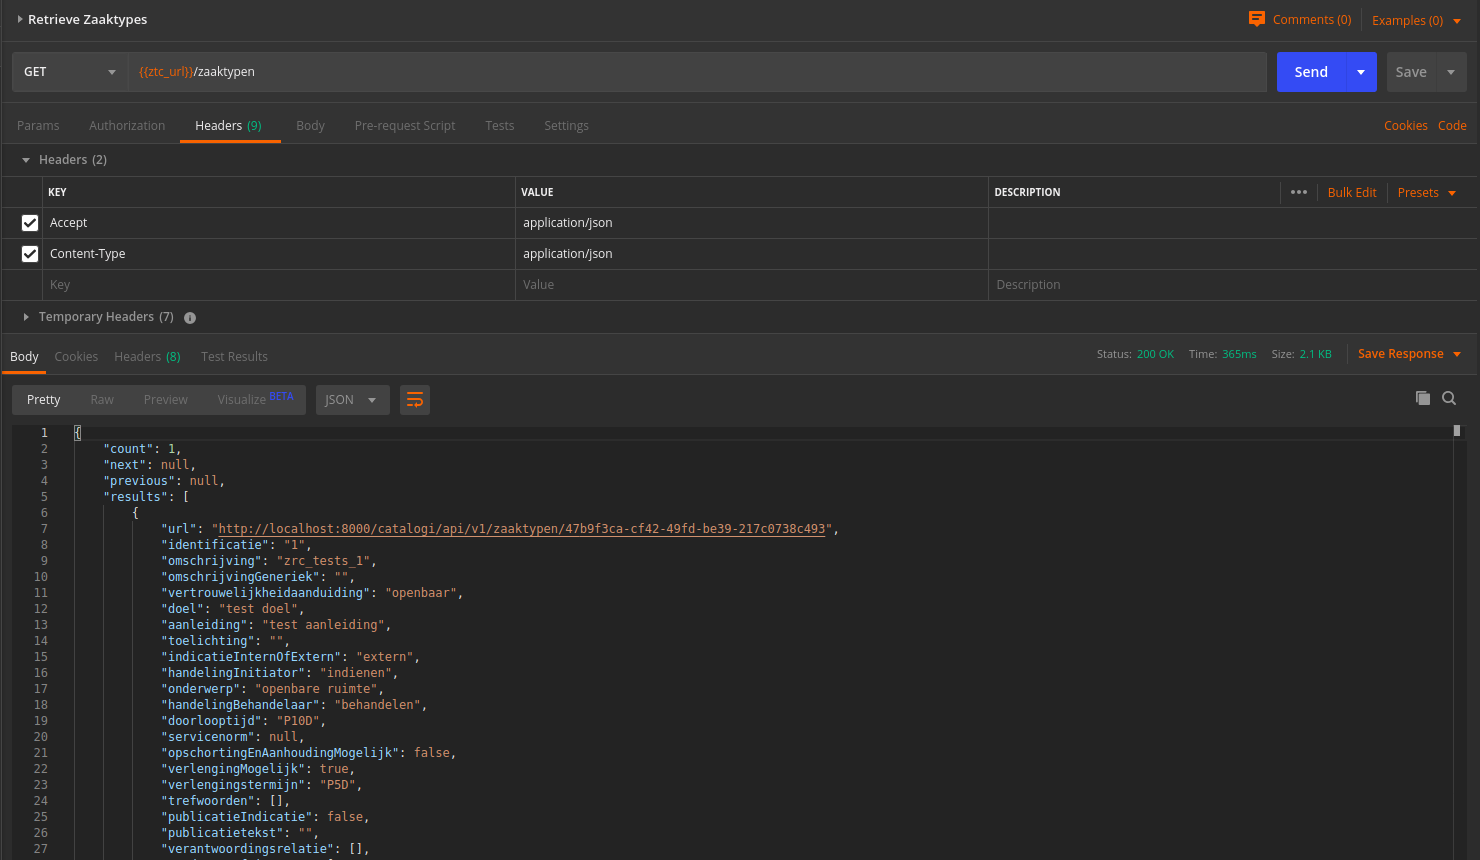
A GET request to the Catalogi API using Postman